GODEX printers we work with, are specific to print thermal labels (that is, labels that can withstand high temperatures and time submerged). Therefore, it is necessary to purchase labels and ribbon that are compatible with these needs. In our stores you can purchase both the printer and the necessary accessories.
Connecting JANBY Track to the printer
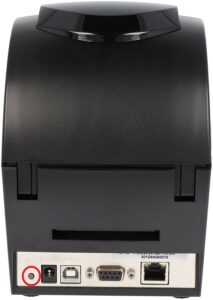
The JANBY GODEX printer needs to connect a power cable in the slot indicated 1 in the image (where to connect the cable that goes to your power socket) and a communication cable in slot 2 (to connect the USB cable that goes to our tablet).

Once the cables connected, the printer has two buttons on the top.
- Left button turns the printer on and off. Press and hold to turn the Godex printer on or off.
- Right button advances to the next label by feeding out a blank label. This button is useful for checking if the printer has correctly recognized the size of your labels. If the printer does not feed a full label or more than one, that means the printer needs to be recalibrated to recognize the exact size of your labels.
If the printer is connected but not responding or not printing correctly
The printer may need to be calibrated the first time it is used or after a label change. GODEX printers have a small button on the back of the printer to do this. Press and hold this button for 4-5 seconds. This will cause the printer lights to flash and recalibrate the label.
If the problems persist, please contact us so we can try to help you.
Setting up JANBY Track with the printer
To use the GODEX printer as a labeling system, you need to go to the JANBY TRACK menu Settings > Printers. If the GODEX is connected and turned on, the screen will indicate with a check that it has detected a Godex printer and you will be able to choose the label size that matches those loaded in your printer.

Note: Android may display a small white window at the bottom of the screen asking if You want to open JANBY Box to use the printer?. We must always ACCEPT this window.
Once this is done, if your license allows you to create Batches and Labels, go to the Batches and Labels menu > Bottom right button > Create Batch > Fill in the form > Print labels.
Which printer models work with JANBY?
In our store you can purchase the GODEX thermal printers that we work with and that we recommend for our labels. However, our system can be used with other printers that you have of the following models:
GODEX: Printers that allow communication through ZPL commands
ZEBRA: Printers that allow communication through ZPL commands
JANBY Track has templates configured to print on these printers with sizes 55x45mm, 55x90mm and 135x90mm. However, if necessary, our technical team can add new templates to your system, so do not hesitate to contact us.
The ribbon (thermal roll) sticks to the label
Thermal printers heat the ribbon to print on labels. If the print intensity is too high, the ribbon may stick to the label. To correct this, in the Configuration > Printers > Additional options > section you can modify the print intensity. By lowering this intensity, the text on the label will be less intense but at the same time the ribbon will not stick to the label.
Printers wider than the labels I want to print
If you want to print labels narrower than the width the printer is capable of printing, the problem will occur that the text will start printing before it reaches the surface of the label.
For these cases, the section Configuration > Printers > Additional options > Shift printing to the right, allows you to shift the start of the print to the left. You will need to try increasing this shift until you reach the edge of your narrow label.